While most photographers would love to be able to move photos off their cameras and give them right to their clients, the reality is that even the most expensive camera can use the help of a little editing software.
Personally, I use Photoshop Elements. I would love to invest in something like CS5, but I don’t really see the need. I’m not a graphic designer, and I don’t have the need for much beyond what Elements is able to do for me.
As a beginner, it is very, very easy to get roped in to “editing” your photos.
What do I mean by this?
Let me explain.
Here is my SOOC (straight out of camera) image, compared to my EDIT. As you can see, I am a fan of clean, warm processing. This process did not come to me overnight – it has been a long 4-year battle of trying to discover my “style.”

In the past (as in 2008...please don't hold it against me), my style might have consisted of this:

Heavy vignette. This is one of the most common problems with people who don’t have a lot of editing experience. However, you can see that such a drastic black ring around my photo really takes away from the gorgeous subject herself.
When using vignette, you want to use it as more of a tool, instead of a hindrance. In other words, allow it to bring out the darks at the edge of your photo so that it gives more depth.
Here is another common mistake:
Over-use of actions. Personally, I have invested a lot of money into Florabella actions. She does beautiful work. Does this mean you need to run out and do the same so you can have nice photos? Of course not. There are a lot of photographers who don’t use actions at all, and there are also a lot of photographers who download free actions from the Internet. Whatever works for you is best; again, however, actions must not be taken lightly. They are a tool.
You want the action to help your photo to stand out, but you don’t want your photo to look fake. In the instance above, I ran Florabella’s Ruby action at 100%. I took a gorgeous photo and destroyed any sense of reality. Instead, try reducing the opacity of the action to, say, 35%. Your photo would then look more like this:
You want the action to help your photo to stand out, but you don’t want your photo to look fake. In the instance above, I ran Florabella’s Ruby action at 100%. I took a gorgeous photo and destroyed any sense of reality. Instead, try reducing the opacity of the action to, say, 35%. Your photo would then look more like this:

And, finally, the porcelain doll:

Some photographers – even well-known professionals – like the look of really, really, really, reallyreallyreally smooth skin. The problem with this is the same problem with the action photos above – you start to lose the “reality” of the photo when you make your subject look like one giant ball of cream.
I like to use Portraiture for photos, but reduced to 8%, feathered very lightly. This helps me to cover blemishes, and reduce the size of pores, but I can still keep the overall skin tone looking normal and true to form.
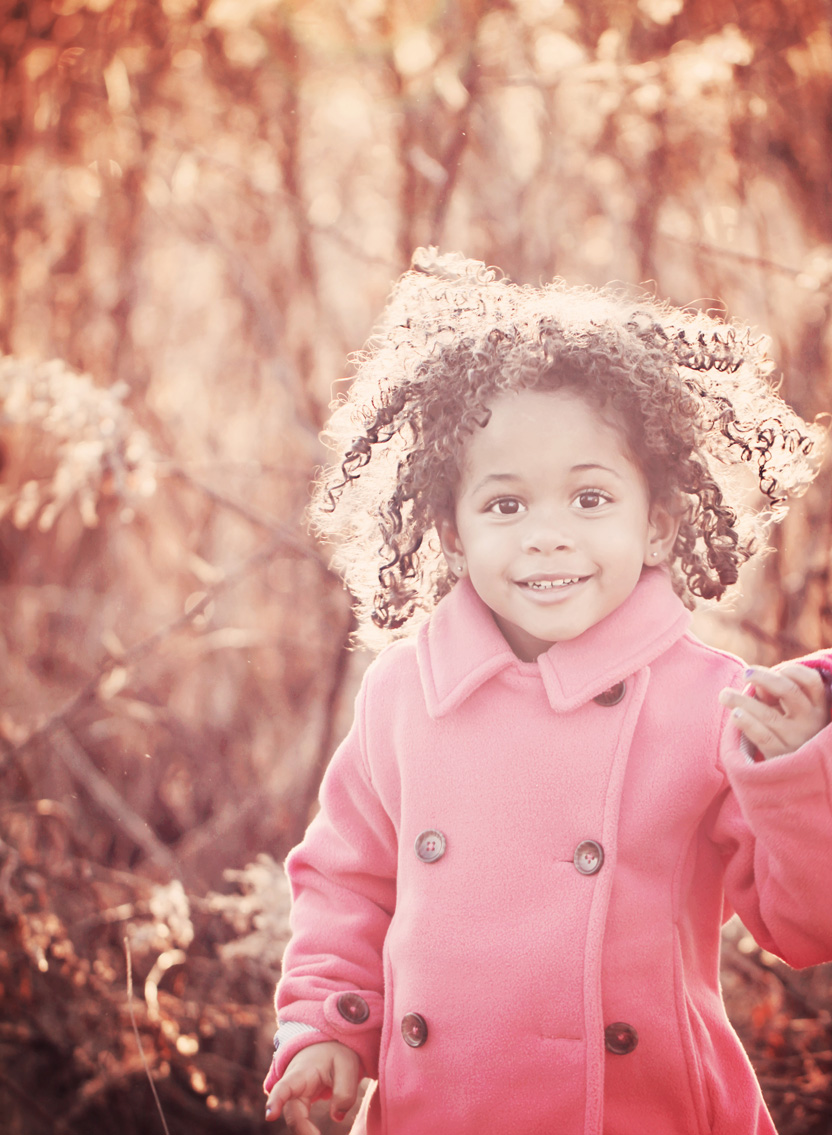
Alright, so here is a step-by-step for how I achieved my clean edit of my subject, Myla.
Again, here is the SOOC:

First, I cropped to 11x15 (a common size for cropping, as it enables the client to print without running into any problems).
Then, I added some warmth. Here, I used Florabella’s Soft Warmth at 50%.

After that, I ran Coffee Shop’s Eye Bright action at 100%. I brushed over her eyes, her lips, and her hair. See how each of those dark elements stand out a bit more?
I also ran Portraiture, making sure to erase back in any lines on her skin, her eyes, her hair, and her coat (otherwise you start to lose details that you don’t want to lose).

One of my favorite Florabella actions is April. Here, I used it at 35%. I then added some contrast by filling in the center of the photo with some light, and upping my levels to 8.

Finally, I used Florabella’s Deep Blue Sky – intended for the sky, just like the name suggests – on the trees in the background. Don’t be afraid to get creative! I love the way it makes such a bleak background stand out so much more. (Don’t forget to reduce the opacity! Here, it is reduced to 65%).

Once I added a little more contrast, I sharpened the photo.
Voila! The final image:

And again, in case you were wondering what we started with:
Good luck!

1 comments:
<3
Post a Comment